Introduction
There are a variety of ways that humans have learned to shape knappable rock into tools throughout history, but the more “traditional”/”native” styles are referred to as “abo” knapping (short for aboriginal). The aboriginal style entails the use of natural materials that you can typically find in the woods off of animals or in creek beds, such as river rocks, sandstone, granite, deer/elk/moose antler or bones, certain types of hardwoods were also used. Modern flint kanppers typically use copper tools or copper caps filled with lead attached to a wooden dowel, though copper/metal tools have been used for some time in North America to shape flint due to its efficiency and durability, modern copper tools are the most efficient/predictable for novice knappers due to the consistency of shock/shape/weight distribution.
I personally flint knap using the abo method as I wanted to understand the struggles of a more simple/primitive man in regards to creating complex tools using nothing more than materials that could be found after walking around rivers and creeks and the tree lines that surround them. I will go into detail about the various tools and techniques that are required or useful to shape stone to your ideal shape and thickness using abo style tools.
1. Large Hammerstones
First, I will start of by describing what a hammerstone is and how it is used in regards to flint knapping. A hammerstone is defined much like its name, as a stone that you use to hammer or bash objects with. Hammerstones are arguably one of, if not, the most useful tool a flint knapper can have. Depending on the size of the stone and the amount of force you can accurately distribute with it you can remove pretty large and deep flakes in stones. The material that your hammerstones are composed of is significant as density of the material you are using correlates directly to the amount of force that you are able to transfer into the rock. These rocks are used to either spall (remove usable flakes off of a large rock in hopes of either trimming the rock down to a rough biface for further heat treating or further processing.
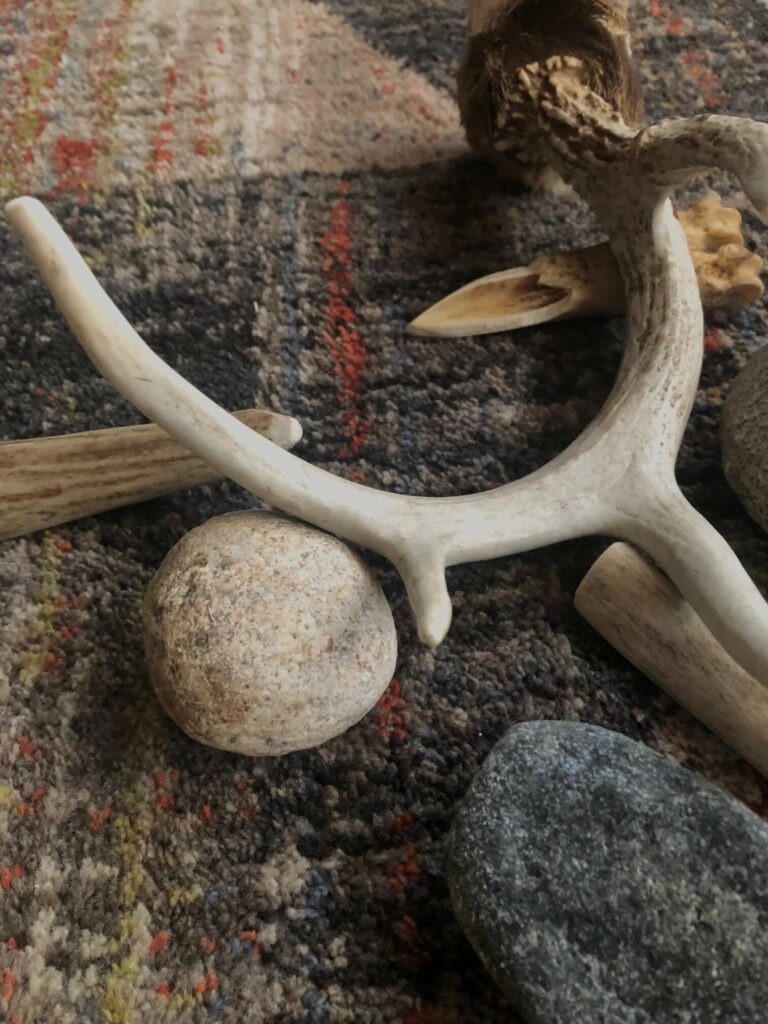
I have two large hammerstones, one of which is made from granite that I picked up in the mountains while fishing for trout in Colorado with the intention of grinding it down and using it as a primitive hatchet or axe, but found its uses as a dense hammerstone more useful. My second large hammerstone is a softball sized flattened sphere that I found while fishing. It is composed of sandstone and while it is still relatively dense, there is no way it could take as much of a beating as the quartz rock I found. The sandstone rock is coarser and helps grab onto rocks a little bit better, but each has its place.

My Hammerstones, Two Large, One Small/Medium
2. Medium Hammerstones
Medium hammerstones have the same overall function of the previously mentioned larger hammer stone; the only difference is that medium to small hammer stones are for more delicate work once the large flakes or bifaces need worked down a little bit more. If you were to use a larger hammerstone it would potentially cause too big of a shockwave within the piece and crack it in two or cause too much material to be removed leading to step fractures in the piece which can be hard to remove. Having different sized hammerstones is very useful in increasing the amount of tool flexibility and can help the knapper have more control over the desired flakes he wishes to drive off of the rock. The density of the stone also matters as it too can impact the amount of force being exerted onto the work piece.
3. Abrader
Abraders are kind of an unnecessary singular tool in regards to abo knapping, but the function of an abrading stone is crucial to thinning down rocks and removing mass. The way it works is on the side of a rock you chip away at the edge until the centerline is closer to one of the faces and you begin hitting it with whatever stone or billet to thin the piece down to shape. The abrader comes in as to remove a flake of material for thinning you must hit a specific spot or lip on the rock commonly referred to as a platform in the hobby. Prior to abrading the stone with said abrader you run the risk of having thin/fragile platforms that will simply crush and crumble when hit to remove flakes, this causes either step fractures or just an unnecessary removal of material due to the shockwave not traveling as far as you want it within the rock.
To use an abrader you can use any rough material to grind down the edges of the stone and make them less sharp/easier to handle, as well as helping reduce the fragility of the platforms. Thus, allowing more mature, pre-planned flakes to be removed. My abrader is just my hammerstone or a rough piece of sandstone/limestone that you can pick up almost anywhere. Realistically though, any rock should work as an abrader, results may vary though based on the composition and size of the abrading stone.
4. Whitetail Antler Billet

Antler Dog Chew Billet
A whitetail antler billet is a great tool to have in your kit. It has the ability to create unique shock patterns in the rock that isn’t as rough as a rock due to its density. It is more lightweight to carry a billet than a hammerstone, but this tool isn’t essential. It aids in added versatility. When people didn’t have antler they used either bone or hardwood. Nowadays you can buy premade billets online on various websites, but the route I went is just ordering dog chew antlers off of the internet and sanding them down to save a few dollars and have bit more control over my tool. If you want to be able to get the most bang for your buck consider looking for complete antler sheds either in the woods or online as a single nice shed can make many tools you just have to cut the antler(s) into various sized pieces/tools.
5. Whitetail Antler Pressure Flaker
A pressure flaker’s sole purpose is described in its name. It is a tool that relies on an antler with a narrow point to be pushed down onto the thin edge of a rock. With enough force the antler tip will push off a relatively small flake. Historically pressure flakers were used to both thin the rock and create serrations along the edge for various arrowhead shapes and cutting tools/knives. Various sized pressure flakers are better at various jobs in respect to pressure flaking. Some thinner antler tines are better for notching though bone can be used.
There are records of antler tines being tied to sticks or glued into sticks to make more of a hand held pressure flaker. There is evidence of the use of “ishi sticks” or pressure flakers with longer handles/shafts (about 2 feet long) to be braced against the arm or under the armpit against the body as to increase the leverage and drive off longer thinning flakes into the piece.

Antler Pressure Flakers

Bone Pressure Flaker/Notching Tool
6. Additional Gear
Additional gear is useful in some cases and almost required in other depending on your own knapping style and what you’re comfortable with doing based on skill and risk. I personally recommend that everyone use some form of eye protection as to prevent glass and sharp rock from getting flung into your eye as that is not something you want to experience. Another item that I recommend is a pair of either leather or synthetic gardening gloves as to help prevent the unavoidable cuts that you will get when working with sharp stone. Some stones like obsidian are sharper than steel at a thin edge so proceed with caution when handling stone that hasn’t been abraded. Leather leg pads are useful too if you like to knap on your leg, some people prefer to hold the rock in their hand for better control making this tool unnecessary for some, but it is just my personal preference. Lastly, consider using a towel or tarp and a bucket as to catch the waste rock also referred to as debitage so that there aren’t sharp shards of rock/glass scattered everywhere making clean up easier and preventing any people from stepping on tiny sharp shards.
Conclusion
The tools of the flint knapper can be as simple as you want in both modern times and in primitive times. It is amazing what our ancestors have learned to do with rock to make some lethal weapons for hunting game and fighting in wars. Flint knapping can be an amazing, cheap hobby that allows you to connect with our ancestors and further understand what it is to be human. It is a means to discover beautiful rocks and create beautiful tools or art pieces. I encourage anyone even remotely interested in the field/topic to give it a go.