Introduction
For those who have found ancient artifacts (such as I), one is typically amazed by the thinness and interesting flake removal patterns on the artifacts. I for one was very impressed with the sharpness of the triangular point despite all of the natural wear and tear that the wind, rain and snow had done to it over the years. For those who keep in touch with me in my personal network know, I have been dabbling in the craft/art of flint knapping for the past few months and have slowly been making progress.
Despite the use of stone tools seeming very archaic and “primitive”, it by no means is an easy skill to pick up and get good at. It seems to take many years and many broken points to begin to be able to predict what flakes will come off of what if you hit it at a certain spot, or why a piece broke while in the thinning period of the point. For many out there, there seems to be a bit of a routine or methodology to their madness and the creation of their tools isn’t always just out of the whim or made without and care about use or function. For a lot of us though the majority of the tool is crated randomly and on the whim. I will discuss a few of the techniques that people seem to have used since before ancient times and how I personally go about the process in order to create a stone or glass tool.
1. Preparing Your Mind, Body And Material
Though it may sound ridiculous to the outsider, this hobby or skill is actually quite physically and mentally demanding. Not only do you have to deal with uncooperative material, but you also have to analyze where and how to remove material from said piece. It takes a lot of prep and patience to really become skilled with efficiently and effectively creating thin tools at a consistent size and shape.
It is easy to want to rush and produce as many pieces as you can in a small window of time, but as one begins to do this, that is not skilled, you begin to see a few issues, one of them being that you are creating errors in the piece. By that I mean that you are creating step fractures due to poor hits or improper set up of platforms, taking chunks out of material because you hit an edge too hard, or even cracked a piece in half because you hit the piece in the middle on accident.
Beyond this, I recommend that people choose the material that they work with carefully. Not all flint or rock is created equally, some are easier to work with in their raw state, and others feel like trying to hit pieces of concrete. Sure, you can try to heat treat certain material either in a fire or in a turkey roaster, but that takes time and energy. If you can try to get some decent quality rock and have a go at it, you will enjoy the hobby more initially despite struggling skill wise.
2. Observing The Material
As you start on your piece, I encourage you to look at how they rock or spall looks. Are there any flat sides? Does it look like there may be another material or inconstancy within the rock? Is the rock cracked internally? These are all things to look out for. They can determine if the rock is trash or able to be salvaged. Once you do this you can begin moving flakes. Try by taking thinning flakes off of the flat sides by hitting a rock as if using your hand as holding the rock like a hammer head and shooing off a flake towards the edge of one of the faces of the rock.
You continue this process until the rock is about an inch to half inch in thickness and ready to be worked on with a more lightweight tool. Then you continue the process and make sure that flakes are being removed and that the piece isn’t just getting narrower as you keep hitting. Make sure the areas hit kind of make sense in the way that you never take material from a concave side, always a convex as flakes will struggle to release from the piece.
3. Thinning the Piece
The phrase “thinning the piece” is subjective. Everyone has their own comfort and preference to how thin of a point or knife they wish to create. Typically, a piece is not finished until all of it is only ¼ of an inch thick at the thickest areas. There are different sets of skills and techniques that one can choose to help and reduce the piece in where it needs.
Before attempting to make the piece thinner there are a few things that you must understand as fact. One being that in order to thin a piece you will have to lose material either in length or in width. This makes that cool 5 inch stone knife turn into a 3-4 inch really thin knife or spear point. Second being that you must have a center line imagined in your head. Imagine a line that goes across the middle of the piece if you are looking at it from the side perspective. This line must wrap around the piece from tip to tip. This allows you to figure out which areas actually need material removed.
A few methods to use when removing material include direct percussion which is just hitting the edge with either a billet or small stone. You can also use pressure flaking (which I will cover in this blog. Another method is to put an ishi stick or sawed off antler tine underneath your knee and hit it with a wood mallet, billet, or hammer stone. You place the antler tine that is underneath your knee where you would like to remove material.
Once you begin removing the material you should be following a wave like pattern on the center line and hitting on the sides where the “waves” dip down toward also called platforms.
4. Abrading
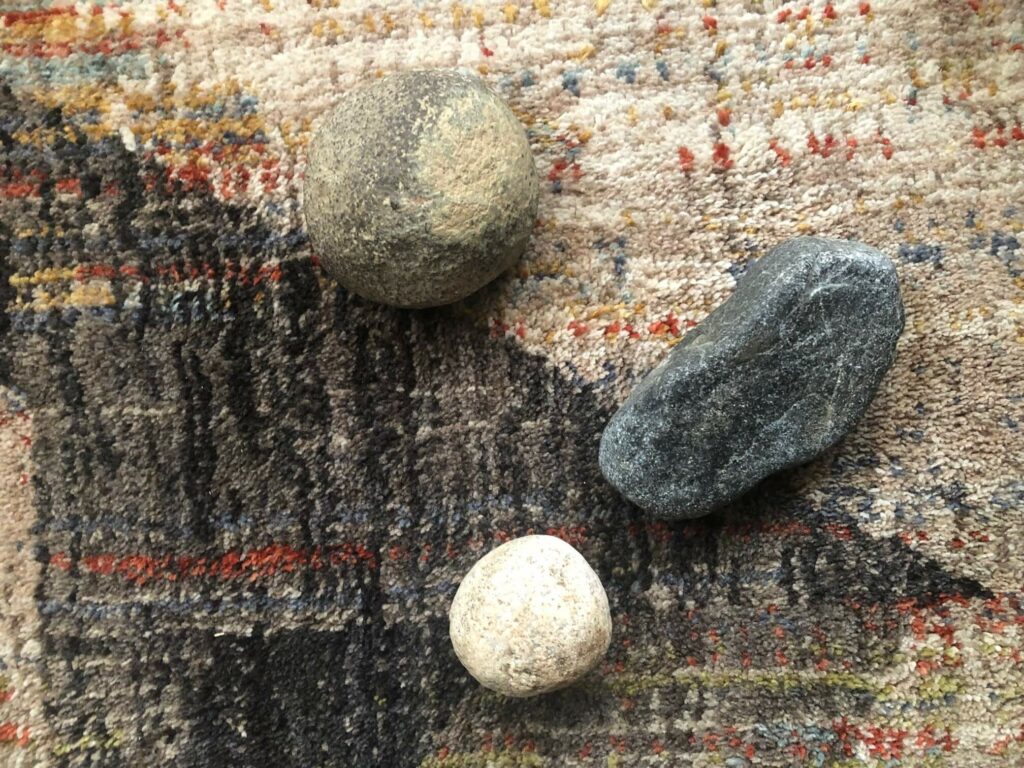
Some of my hammerstones where you can see abrasion marks from use.
Abrading is crucial to making strong platforms in-between hits when thinning a piece. If you do not abrade there is a high chance that you will create tough step fractures which are hard to remove and will just remove material from the edges rather than actually thin the area you wish to thin.
To get a good abrasion use either a rough piece of sandstone or limestone and grind down the edges that you wish to keep working on until you see a white outline on the platforms along the edge of a piece. Don’t forget to keep doing this periodically because as you work your way down as it becomes more and more important.
5. Pressure Flaking
Pressure flaking is what I consider one of the last things you do before finishing a piece. Typically you use either a fine pointed antler tine or a copper nail implanted into a wooden shaft. People use pressure flaking to create small thinning flakes or to sharpen the edge by creating small serrations or slightly jagged edges. It can also be used to slightly lower or raise the center line if you are wishing to remove more material from one of the faces on the material.
This process takes a relatively decent amount of force and energy if intending to create large flakes from it. To ensure that your flakes can make the journey to the center of a face, you must ensure that your platforms are up to par along the edges and that you can create enough downward force into the piece. A lot of people use the leverage of their knees to kind of clamp together and generate force that their wrists otherwise could not.
Most people tend to go around the enter edge a time or two flipping the piece as they see fit as to clean up the piece a little and remove any small abnormalities or errors that are close to the edge. Once this is complete you can use the edge or side of your tool to make the edges more symmetrical and into the shape/design that you want, though some people usually do this with just pressure flaking as to avoid dulling the tool.
6. Notching
Nothing is what I consider to be my final step. Its soul purpose is to create little dimples or areas that are to be used to haft the tool onto a handle or spear/arrow shaft. All you have to do is ensure that your piece is thin enough to be notched (1/4 inch or thinner) then you can use you pressure flaker or a copper nail, there are a lot of tools you can use/make for this job. You then find the area you wish to haft the stone tool and begin crushing the edge like you are pressure flaking, but with less force. This is one of the more difficult steps as it is very easy to break a piece or the surrounding area with too much force in a certain area. It is important to not rush this process and really listen to the piece you are working on.
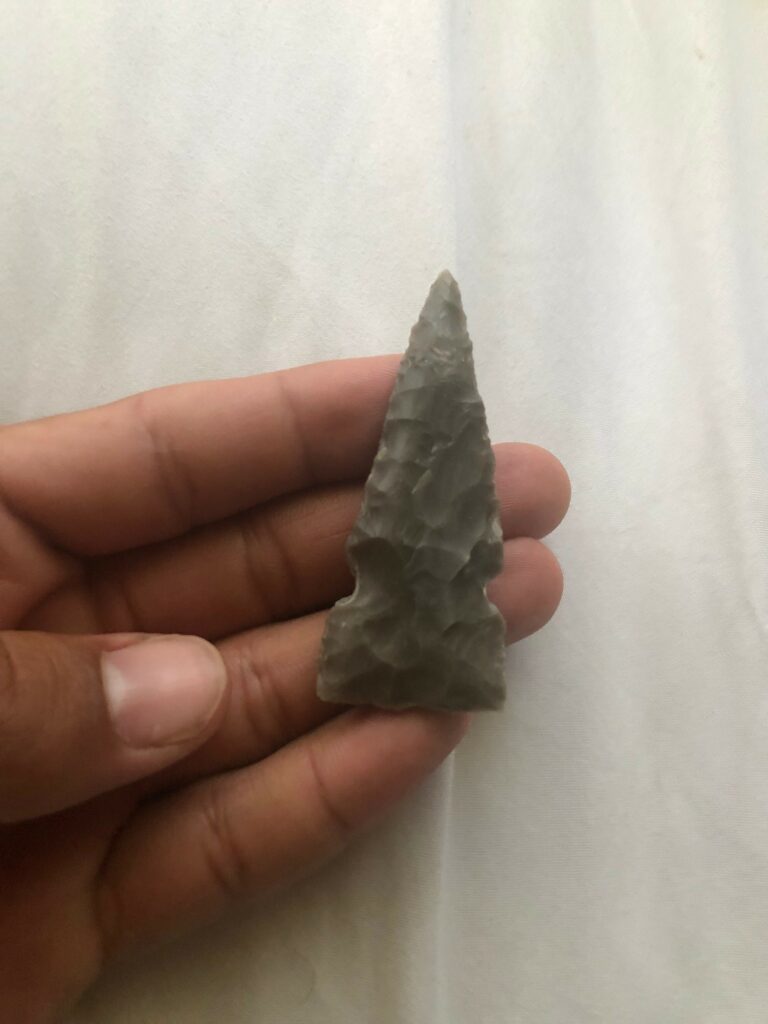
A recent side notched point I made.
Conclusion
Making stone tools isn’t as difficult as it seems, sure you are at the will of a large amount of variables, but once you begin to breakdown the process it isn’t as difficult as it seems. It helps if you see someone do it in person or on video as everything I just wrote about will start to make more sense. I hope that you learned a thing or two about how I make my stone tools and more about each little process that goes into the creation of the tools. I encourage everyone who is slightly interested to give it a try, just make sure you have the right protective gear.